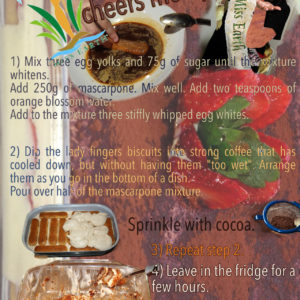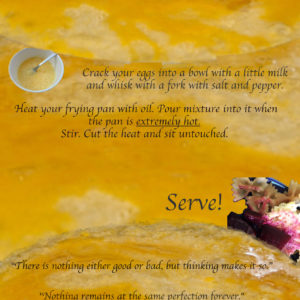
“Pain à l’oeil” is a play on word with “pain à l’ail” which means garlic bread. “A l’oeil” means in French that you do not measure or weigh the ingredients but rather you look at the aspect of what you are cooking to know the quantities you need for each ingredient.
I tried many recipes and it took me a long time to succeed making my own bread. I started with bread machines and never managed to make a good bread … Of all these experiences and readings, I concluded four things:
– Our grandmothers were right, weighing all the ingredients is not the right method for a lambda cook. It’s good for starred chefs and bakers. Everything must be done to the eye because …
– Your bread recipe depends on a lot of factors: room temperature, salt’s and yeast’s composition, flour quality (prefer organic food, not industrially produced, not imported from a country that does not conduct inspections or buy it directly in mills that are attentive the quality of their flour) and the quality of the water (if you live in a city that often changes the treatment of water, you will have to consider using mineral water). I do not have this problem and my tap water is perfect (there are websites that give you information about it.)
– I really do not know how to knead. I use a Kenwood Kmix blender. Adjust the kneading hook so that it sinks to the bottom of the bowl without touching it. I have a red one because it goes faster, like the Ferrari! (I’m joking).
– There is no good bread recipe. Everyone must create their own recipe. If you succeed your bread the first time, BRAVO!
Here is my first recipe for wholemeal bread with a tight crumb.
I hope it will be a good base for you. The numbers are pointing at each step with the corresponding image above.
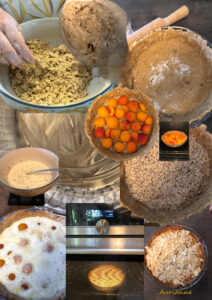
1. Choose this amount of fresh yeast, about 20 g. If your bread has the taste of yeast, put a little less the next time; if it does not rise, put a little more.
2. Put about 4oz (130ml) of water and 4oz (130ml) of milk and heat for 1 minute in a microwave or in a pan. Optional: add mixed flax seeds and/or sunflower seeds.
3. Leave the yeast in the mix and do a small household task (that is just an example, you can also look on social network but it’s risky because you may spend too much time there, which is not the case with a domestic task…) The yeast must have the same appearance as the one on the photo number.
4. The whiter the flour, the easiest it is to make bread but it is not as healthy for those who will eat it because it will release its sugar at once and their stomachs will not have those mid-morning or mid-afternoon hunger pangs.
Personally I use between 1/3 and 1/4 whole wheat flour, to which I add whole spelt flour (1050) and whole rye flour (T 110), which I add by eye to the mixer until the dough no longer sticks to my finger.
5. I add nuts kernels, never the same amount of course. I mix a minute with the robot on 1. I then add about a tablespoon of olive oil and salt (which should not be in contact with the yeast). I mix in the blender between 2 and 5 minutes.
6. The dough should look like the one in the photo if you want a dense loaf. Alternatively, you can add milk if it is not elastic enough and too crumbly (the more elastic the dough, the airier the bread); flour and olive oil if it is too liquid.
7. When the robot is turned off, use a plastic spatula to put in the center the flour that has not mixed.
8. Remix if necessary.
9. Leave for at least one or two hours under a cloth.
10. The dough must have lifted as shown on the picture.
11. Remix, setting the robot to 1.
12. Leave to rest by putting a cloth on the bowl for at least one or two hours more.
13. The dough should have lifted as shown in the picture.
14. Optional: mix again if there are large bubbles.
15. Put the dough in a cake pan covered with baking paper.
16. Leave to rest while preheating the oven to its maximum heat (280-300°C in my case) and cook for ten minutes. Add more baking time if the bread smells of yeast or is damp to the core.
17. Turn off the oven, leaving the bread inside. When the oven is cold, you can take out the bread and treat yourself.
Do not have eyes bigger than the stomach.
The miller’s tale: poverty, obesity and the 45p loaf | Society | The Guardian: https://www.theguardian.com/society/2018/jun/03/obesity-food-poverty-cheap-bread

Here’s a second recipe for a wholemeal bread that rises.
1.Pour all the ingredients below in the order listed into the bowl of your kneader:
300 ml water
1.5 teaspoons salt
150g T 80 wheat flour
150g type 1050 wholemeal spelt flour
200g rye flour T110
20g fresh yeast
two handfuls of shelled walnuts
a handful of sunflower seeds
a handful of flaxseeds that you have ground in a blender
2.Knead for about 8 minutes.
Optional: let rest for half an hour, then fold the dough several times.
3.Place baking paper on the oven tray. Place the dough that should be sticky on it and shape your bread. Cover with a cloth. Leave to rest for at least 2 hours.
4.Bake in a hot oven at 220°C (gas mark 7) for 30 minutes.

How ultra-Processed Bread took over America – Ultra-Processed Life – Business Insider: https://youtu.be/NYi-7iaqmHk?si=YLEfXdajqIqAb2UY
A nice slice of homemade bread with organic honey or homemade jam is much better than factory-made cakes.
Translated with Deepl